Hello Dear Reader,
As promised, here is some very basic sewing to make an envelope cushion, that’s a cushion without any zippers of buttons. I’m using luxury heavy weight linen, in a hydrangea design. I want my living room to look like one of those rooms in ‘House and Gardens’ but mine will be upcycled, freecycled and scrounged as I have precisely zero pounds to spend on it. This fabric is from a sample book in a curtain shop that was disposed of, it came to me via a friend who saw it being thrown out and I’m very glad of the donation.
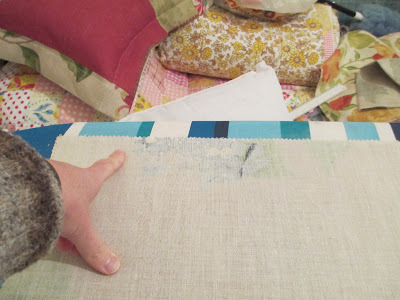
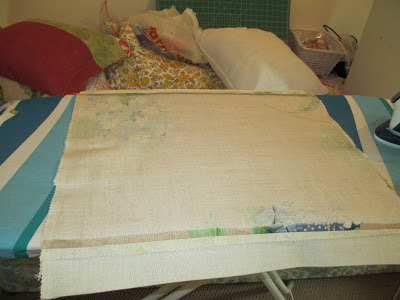
I have cushion pads which are 18″ by 18″, which I want to be firm so I will make the cover slightly smaller to squash the cushion pad in. I started by measuring my offcuts, which are from a sample book, they are approximately 21″ by 21″. I needed three of these to make my cushion cover. You could use a piece of fabric which was 21″ by 63″ if you have it. I like natural fibres as they are easier to work with and run away screaming from man made fibres as they are a devil to sew with.
I ironed it all and then pinned and sewed the top edge (the edge away from me) with a quarter inch seam, I’m not precise but roughly about that much.
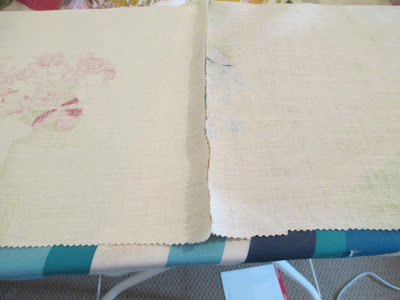
I then sewed all three pieces together with the same seam allowance.
You can see my fabric is themed, tonal but certainly doesn’t match. I can’t afford to buy any fabric so I use what I can upcycle or that has been given to me. Being frugal sometimes means not being fussy but making the most of what I have.
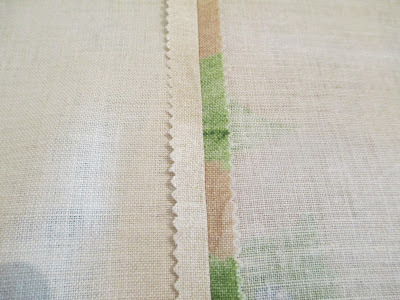
I pressed the seams out from the middle.
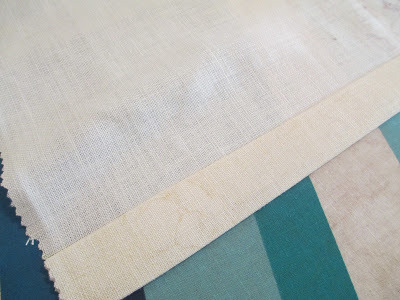
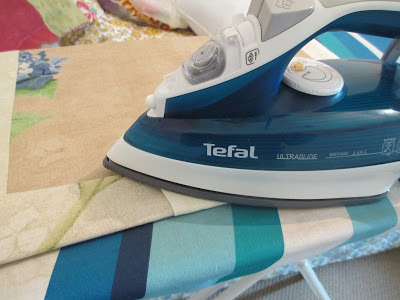
I then took both raw ends and folded a one inch turn and ironed.
I then turned again and ironed again.
Here is the finished seam and then turn over and iron the right side as this will be visible and you want it to look neat.
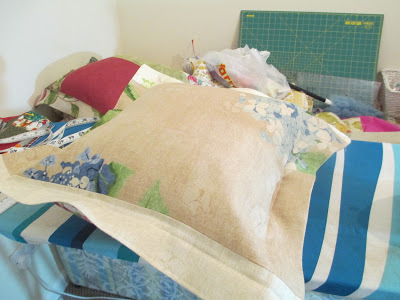
Next, with the right side on the inside, fold over your cushion pad so you have a four inch (or thereabouts) ‘opening’ - the overlap means the cushion will sit neatly without needing any buttons or a zip. Pin carefully secure the ‘size’ you want, without pinning to the cushion pad, which you are going to slide out.
You need to check your central panel, if you have used offcuts, is in the centre and you might need to un-pin and reposition. I then sewed a half inch seam on either side and then ironed both sides to make sure it was completely flat.
I then turned the cushion cover the right side out and poked my fingers into each corner to push it out and make sure it was square, then using a steam iron I made sure it was flat and very square. Using the cushion as a guide, I worked out I could have a seam running round of just under 2″ to create a housewife pillow effect.
I then folded each side at 2″ and ironed and then sewed on the outside of that line.
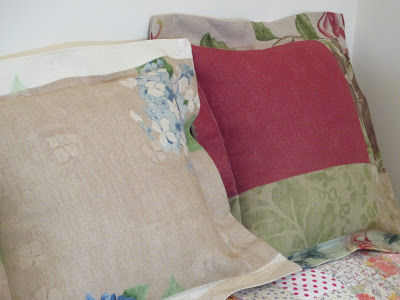
When everything was crisply ironed, I stuffed the cushion pad inside and here’s the finished result.
Here are the two I have made so far and I’m going to make six more for my living room.
This is the one I’ve made today.
Here’s what the back looks like, on the cushion I made yesterday.
The cushion pads cost me £1.35 (or 65?) each, which is exactly what the cushions have costed each. I make things out of old fabric that was either from a charity shop, thrown away, from a jumble sale and I make do and mend. I want my house to be homely and comfortable and I have no disposable income for refurbishments so I have to be creative. You could use denim, or jumble sale or charity shop curtains or any substantial weight of fabric to make your cushions.
I have a lot to do to my house next year and I’m going to have to be ingenious to do most of it. Anyone else doing up a house on the square root of naff all? We can swap ideas. I hope this tutorial was useful and as requested there will be a ‘star block’ tutorial soon.
Until tomorrow,
Love Froogsxxxxxxxxxxxxxxxxxx
Like this:
Like Loading...


I'm in the process of doing up my house at the moment with a budget of about 50p!. I have been making Roman blinds recently (I made one out of a single Egyptian cotton sheet that I bought from Trago Mills which was a bargain). I was a bit doubtful that they would work but they have turned out beautifully and for a fraction of the cost of custom made ones which are ridiculously expensive.
I can't wait to see the lovely things you will be making for your house.
LikeLike
Hello Froogs
Budget here of naff all as well, was like that for crimble as well due to one enormous vet bill and a bit of a pranged car!
if I'm making cushions i use really tatty old strips of fabric stripped sewed and finished off to make the innards if the fabric im using is a bit bright i will tone it down by making the back side the front. I normally trawl car boots for innards have been v lucky and found good clean ones for very little normally less than a £1.
Just done the downstairs loo. bought a tin of paint with the wonderful name of HIP HIP HOORAY! yellow form a charity shop 2.5 liters for £3 rescued some pine shelving from a skip and re pained a old orange pine cupboard think the total came to £6 and we have an uber posh loo!
LikeLike
Hi Froogs,
Great tutorial. This would be good to freshen up your existing cushions too.
Barb
LikeLike
I've been revamping my home for a while now, and it's a SLOW process because I shop my basement, what I already have, I move things around or declutter. I redid everything more or less following the lines of Feng Shui, which totally corresponds to the frugal mindset, basically. Since the garden is just a blanket of snow, I might write about this soon. If I can find the time or do not feel too depressed - winter is terrible plus I'm having a hard time with some sisters story… so cleaning and decluttering will be therapeutic.
LikeLike
Cushions look terrific! Cheers Judy xx
LikeLike
What lovely pillows. Almost 25 years ago I took a smocking class from a much older lady. She was a wonderful teacher and I still use many of her tips. The one I remember the best is “spare the iron, spoil the garment.” And I see you understand that also. If you try to stitch without pressing your pieces well during the process, the finished piece will look like it was made in a blender. I can guarantee it. Absolutely wonderful tutorial.
Can't wait to see the rest of them.
Tana xoxo
LikeLike
Fantastic tutorial - I have two sets of cushions, one in pinks for Spring and Summer, one in teals for Autumn/Winter. Sadly the ones I have just put away for next Spring are very tatty, so I'm looking forward to upcycling some thrifted fabric in the Spring now! :0)
LikeLike
I need to decorate 2 bedrooms in 2013, the main one and the small one. I was hoping I could cut the carpet down in size from tha main bedroom and use it in the small room as it is still decent, but my daughter isn't happy as she doesn't like it and its not the colour she was planning to do her room. Maybe we will have to keep it and just do the walls, which are desperate. Never done our main bedroom since we moved in the house in 2000! We are really overdue, but good luck with your venture too!
LikeLike
The square root of naff all! LOL!!! That describes my budget precisely! We have a friend moving in to lodge with us after Christmas, and have been doing up the spare room. It's amazing how a lick of paint can improve things. With no spare cash, we made it known that we would be really happy to se up any bits of paint that were cluttering up our friends sheds and garages!
LikeLike
I have a budget just like yours to do up my house next year! I have done some in the past year. I have the living room to finish, the kitchen, my bedroom and the upstairs bathroom to do. I will be reading what you do with interest.
I'm thinking putting lots of things I no longer need on ebay to help raise some cash for things I do need to buy will help.
LikeLike
They are gorgeous cushions and a fab step by step guide xx
LikeLike
even I could do this!!!!!!!!!!! I may even give it a go!
LikeLike
Fabulous! I am bad at sewing but have made a few cushions and it is very satisfying. I reckon you can do a lot with some home made cushions, a crochet rug, some plants from the garden shoved in vases and a ginger jar x
LikeLike
Love the cushions. Thanks for the tutorial,the slip cover is much easier than trying to faff about with zips. I'm inspired to get the sewing machine out again. I've just recovered a £1 charity shop wooden chair with a 50p remnant from a different charity shop, I think the material originally came from a sample book. It just needed to be stapled in place over the existing seatpad, having first unscrewed the seatpad from the frame. It looks lovely and fresh, the wood matches the existing furniture in the spare bedroom and the fabic tones in well with walls and curtains. Result! and frugal too.
LikeLike
Another one here revamping the house on a non existent budget.I'll be shopping the shed and garage, and getting creative.
Love the cushions 🙂
LikeLike
great tutorial, have made a note of where to find it when I try and make some myself, thanks
LikeLike
They look great and certainly as good as if not better than some I saw in a ridiculously expensive gift shop yesterday for £30each!!!
LikeLike
they are really nice, I use old t-shirts to make cushions and then put them in the boys room. Love you
LikeLike
The cushions are so pretty! Much nicer than store bought. It is a good feeling to make and make do!
LikeLike
I am so glad I found your blog. I too am trying to do up my home gradually. I have a huge pile of jeans and shirts I am going to get creative with. Looking forward to reading previous posts to see how you have managed to pay off your debts. Jan from sussex
LikeLike