Bag yourself a give away!!!

Hello Dear Reader,

It’s been really windy here today. I’ve been in and out with the washing and up and down the street looking for it when it mostly blew away! Some poor unsuspecting pensioner probably has my ‘holiday knickers’ hanging off their door handle as we speak as I can’t find them!

I’ve actually found some time to use my new sewing machine and love the way I can programme it to sew letters. I’m thinking of a name for my bags and gifts in some kind of ‘Made in England’ sort of way. I like Froogy recycled. I also like Recycled by Froogs and Yoost-abee because it used to be something else.

The bag I made today used to be a button up pinny which I bought in a charity shop for 50p. The pink linen was part of a huge bag of fabric from the Scrap store which worked out to cost me about 25p an item.

I’m giving this bag away! You need to be a follower and leave a comment here saying which of the names you prefer for my bags and gifts.

What name do you prefer? Froogy Recycled? Recycled by Froogs or Yoost-abee?

I’ll run this for the week and put a link in every blog for the rest of the week to link back to this post.


Now over to you. You will need to become a follower if you’re not already and leave a comment stating which name you prefer. I will draw a name out of something hattish on Sunday night and then post it as soon as I can.

I look forward to hearing from you. I’m now off to look for my knickers!

Love Froogs xxxxx

Up-cycling a tablecloth

Hello Dear Reader,

I’m hacking my way through the undergrowth in my garden, trying to win the battle with the weeds and the rain beat me indoors. Living up to my pledge to use up what I have, I looked at my stash of jumble fabric and sadly found a huge hole in a tablecloth I bought from a jumble sale last year. Again, I bought it for the fabric and initially thought I would use it as a sofa throw. The hole is right in the middle. I decided to use the fabric instead. People have asked for a bag tutorial and today, I tried out a tutorial from a favourite blog site. Here is the tutorial to make this bag. It’s very easy, although I didn’t follow the measurements.

I didn’t even notice where the table cloth came from. It’s a jute based fabric and broke one needle in my machine. The contrasting fabric came from the scrapstore but I recognised it a ‘Clothkits’ design probably from the early 80’s. The tablecloth cost me 20p and the contrasting fabric didn’t cost me anything (although I pay an annual subscription to be a member of the scrapstore).

If you have a look at the tutorial, you can work out how I made the inside!

Here’s one photo of the finished bag - typical, I came inside to sew and the sun came out!

Lovely, lovely, lovely…………..I’m going to enjoy putting my shopping in this!

And here it is, gracing my sewing room door handle with the sunshine pouring in the window.


Now I need to get my wellies on and get back out in that garden! I’ll be able to share my massive garden tidy up operation really soon. That is, as soon as I can so I’m not ashamed of the over grown mess.

Until tomorrow,

Love Froogs xxxxxxxxxxxx

Bye Bye Blanket

Hello Dear Reader,

I am officially the world’s slowest knitter and I promise not to do any ever again! I’ve been knitting this baby blanket for so long that the baby I knitted it for has gone to school!!! I offered it to someone whose blog I read and it’s going to be posted to another real baby, who will be born in June! I actually got it done on time, well this time, for this baby!!!! It’s really snuggly and lovely and the baby wool came in huge balls and cost only £1 per ball. In future? I’ll stick to quilting!

Bye Bye blanket! xxxxxxxxxxxxxxxx

To the recipient, it will be with you soon.

Love Froogs xxxx

Knitting when you’re not very good at it.

Hi everyone,

I can not thank you enough for the kind words, I never feel as I deserve any of it. This blog is just a diary of day to day existence when you don’t have any money. It’s about a bumpy journey with some long dull days trying to fill themselves. I’m still astonished that any one reads it even more so that so many people are enjoying it. Thanks again for commenting, it’s good to know some one’s listening. If you’ve already become a follower, then many thanks and if you haven’t please try and help me get to 600 hundred followers. I’m hoping to make to one thousand by the end of the year. I know lots of people read as the ‘stats’ show the blog gets over 2,000 hits a day and it would be lovely to know who you are by becoming followers.

I’m home alone today. I was due to go to Bristol to see Dearly Beloved’s mum. We take the dogs with us and make it a long day by going there and back in the day. We go as often as we can. I’m home and emotionally drained after the anxiety of the last two days and just need to be quiet. I’m using the new skill that Foster Mummy taught me and I’m knitting my own rug. I’m a very bad knitter and it takes me ages as I get bored of anything repetitive and have to put it away. I love knitting as it’s something I can pick up and put down when I please. I thought I would show you today’s efforts.

Each strip is from the body of one tee shirt, which I cut into lengths and then pull tight as I wind it into a ball. It’s very heavy to knit and my hands are aching from what I’ve done already. I’m knitting mine on my circular needles as 60 stitched fit easily onto this. It feels lovely, already like a door mat or bath mat.

I’m loving the fact that these old tatty 50p each tee shirts will not go to landfill but are going to be put to good use. I hate waste and can’t bear the thought that people see clothes as disposable and get so little wear out of them All the clothes I have from charity shops are like new and I’m more than happy to take them away and wear them to give them another chance of being used. The tee shirt rug is like that. I could knit this for years, simply using up old tee shirts (that we got second hand in the first place) as they get too holey or scruffy to wear.

You don’t have to be any good at knitting to make blankets or bath mats, this is about making something usable out of something that was going to be thrown away. It’s about conserving and being sustainable. In my case, it’s about having some fun and doing something I really enjoy and not worrying that I’m not very good at it.

What do you do, that you’re not very good at, that you enjoy and, as Columbo would say, just one more thing. If you’ve got any old tee shirts and want to see them put to good use and turned into my new door mat or bath mat, then email me on [email protected] and I’ll send you my address. I’m off to have some more very cheap fun and knit with my feet up.

As every, until tomorrow,

Froogs xxxx

OOOOOOOOO! I love it!!!!

My second batch of soap has turned out better than the first, so I’m looking forward to being progressively better at soap making. I have masses of my old soap left. I have grated it and blitzed it and added washing soda and I use that to wash the dishes and the clothes. I use it simply grated and without washing soda to wash the windows, the floor and door frames. I have even used the remnants of the ‘washing bucket’ to clean out the toilets and it cleans that too.

I have a bar of it by each sink, I use it in the shower and I love the fact that I’ve made it! It looks a bit angular but that soon soften up once it’s been rubbed over wet skin or a flannel. I’ve made bigger bars this time as it shrinks as it hardens and it gets better the harder it gets (absolutely NO ‘Carry on’ jokes permitted in the comments as I know how silly we can get with a bit of double entendre!!!)

I used to love to wander through Dingles, sniff the Chanel and marvel at the Clinique and buy the odd treat of toiletries but my new found love of the soapy smell of homemade soap around me, the laundry and the house is something I have just fallen in love with. It’s just the soapiest mildest most natural soap I have ever used and as I’ve just got out of the shower, should you sniff me……..you discover that the lavender whiff it leaves behind is just lovely.

Frugal Soap Making tutorial

To make soap you will need some basic equipment. A very large measuring jug, wooden spoon, goggles, thick rubber gloves, apron, stainless steel large saucepan, a hand blender, moulds for the soap and accurate digital weighing scales.

The ingredients, suppliers and prices:

295g of caustic soda - Boots - 1.44
750ml Extra Virgin Olive Oil - Tesco -2.25
850ml Sunflower Oil - tesco - 1.05
625g Cookeen - Tesco - 1.25
half small bottle of Lavender essential oil - Liskeard posh handbag shop/now closed - .50
900ml water - I use bottled but you can use tap.

total = 6.49 and I will make 24 large bars of soap at 27p per bar.

I followed the instructions and recipe for soap on the Channel 4 website. There are many soap making websites, with recipes on the net. It is very easy and very cheap to make. Do not imagine your soap to turn out to be the mass produced type of soap you find in Tesco, the cheapest bar I saw in there today was 43p for their ivory soap. There soap will have animal fat as the main product, certainly will not be one third olive oil and certainly not have the purity and simplicity of homemade soap.

Start by very careful and accurately weighing your ingredients. Add the solid oil to the liquid oil and gently heat in a stainless steel saucepan until all the ingredients are liquid. Leave to cool.

Now measure out the water and ADD THE CAUSTIC SODA TO THE WATER!!! NEVER the other way round!!!


Make sure you are wearing gloves, apron and goggles all the time, if you splash your skin or clothes you can make holes in your clothes and seriously burn yourself.

When the oils and caustic and water mixture are a similar temperature, gently pour the caustic mix into the oils. You can check the temperature by touching the outside of both containers. They should be still warm when you mix them.

The mixing and blending takes ages!!! and ages!! and ages!!! You will have white finger by the end of it, but you just have to keep mixing.

The more you blend and stir, the more gloopy and custard like the mixture becomes, as it saponifies. As it starts to thicken, you can add the essential oils. It’s your choice. I like something inoffensive and simple, such as lavender.

You can see from the picture below that the soap is starting to reach trace, when it does so, you can lift the blender out, pour the mixture across the surface and it will leave a trail.

Below is an example of the soap being at ‘trace’. I have lifted it out of the mixture and it leaves a noticable pattern when I stir the surface and drop some soap on top.

Below is an even clearer picture of trace.

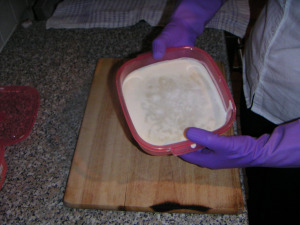
Below, you can see the pale colour of ‘real’ vegetable soap.

I pour mine into plastic tubs, but old margarine tubs or ice cream tubs will do. I fill them right up so I can have quite large bars of soap as they shrink when you dry them.

The soap starts to set and harden straight away. This is the second batch of soap that I have made and I am already using the previous batch. It is a low foaming soap and very mild on my skin, as well as having a gentle lavender fragrance that permeates through our home. It grates well for clothes and household washing and it holds together well in the shower.

I mixed the oils and caustic mixture at a warmer temperature than I did last time and I only used my hand blender to mix it, it came to trace quite quickly and I blended it a lot more thoroughly than before and I used more essential oil than before. You will find that subsequent batches of soap are of a better quality than your previous attempts.
It’s a very low cost alternative to the artisan soaps that you can buy from companies such as Faith in Nature and Ecover. It’s very soft on my clothes and has a gentle real soap smell on dry laundered clothes as well as leaving my skin really soft from the conditioning affect of the olive oil.

After pouring into moulds, I put the lids on the boxes and they are sat wrapped up in towels to keep them warm over night. I will remove the towels and check the soap tomorrow morning, although it was set when I checked it a few hours ago, the latent heat keeps ‘cooking’ the soap.

Tomorrow, I will turn it out onto a scrubbed chopping board, cut each box into eight large bars and I will store it on a tray at the top of the airing cupboard for a month before I use it, however, the longer it dries in the air, the better is seems to get.
It’s also a lovely hobby and fun to do. (P.S - in case you think I’ve been lazy, today I have made: Blackberry gin, blackberry and apple jelly and the soap)

Soap making day 2


The first thing I had to do was to clear out the top shelf of my airing cupboards, which has slatted shelves so I had somewhere to leave the soap to cure for the next four week. Memo to self - soap may be ready on the 7th September.
I then checked the soap and it had solidified and it looks soapish, so I must have done something right. I was careful, I used gloves and made sure I cleaned up any soap that I dropped as it is still caustic at this stage and can still burn. The condensation on the top of the lids smelt like pure hydrochloric acid (brilliant! my second use for my O level Chemistry!) and I was careful to ensure I didn’t burn myself, the dogs or anyone else.
I tipped the soap out onto my chopping board
And then proceeded to cut the soap into bars, big enough to use.
It’s interesting to see that it has already started to cure and some of it has changed colour and texture where it has dried out.
The darker section of the soap is nearer the surface and already has soap like texture. Notice the extra thick rubber gloves, I’m still very nervous of harming me or anyone else.
I piled it all on a tray covered with an old tea-towel. The soap stripped the cloth of colour where it touched it, but it’s old and it didn’t matter. It was interesting afterwards when I rinsed the cloth out in warm water, that it smelt like Ecover washing up soap powder that I was my clothes with! So Ecover, I have your secret!!! You just make ordinary plain old natural soap, grind it into little bits and put it in a box! Gotcha!


I then carried the soap upstairs to the airing cupboard (now you all know even more about me and that my bedding is not ironed!)
I brushed the loose bits off first, so not to drop any onto the towels below and placed them on the shelves to cure for a month. There they all are. I made 40 bars of soap, with only natural ingredients for 14p per bar. I think I’ve made a year’s supply too. I’m going to wait until September to see if it turned out alright, if so I’ll make a load more that I hope to use for gifts for Christmas. Any suggestions for fragrance from the soap makers out there?

Staycation soap making

I’ve had a lovely day, made especially so by the visit of Foster Mummy and family and my apologies to them for being ‘low’ today………..I wasn’t at my best; nonetheless it was wonderful to see them and to get the chance to try out some vegan cuisine on them of: chick pea and sesame burgers, butter bean pate, roast butternut squash, with roast sweet potato and courgette. Thanks so much to Man Wonderful for the wine! I’m drinking it as I blog.

On the soap making adventure. I’ve never made soap before but I knew the O level chemistry would come in handy one day! You start off by measuring sodium hydroxide and adding it to bottled water (the water can not have chlorine in it so tap water won’t do apparently). You must add the NaOH to the water and stir. You have to wear goggles, an apron, long sleeves and thick rubber gloves. ………this will eat through flesh and bones.

Stir well in a well ventilated room. Do not fall over the bucket!!! In a pan, melt solid vegetable fat (or if you’re minted……..solid coconut oil) and then add the olive oil and sunflower oil. When melted, add to the solution of sodium hydroxide.

Then you stir for an hour!!! In the end it changes colour and textures and has the consistency of custard, when you dribble some on the surface it leaves a visible trail.

Below is the soap, mid way through stirring……………..this is really boring but the Archers was on the radio, so that entertained me for a while.

Once it changes colour and texture to resemble custard, add the essential oil. I used half a bottle of lavender oil, I could have added more but it smelt so strong that I was cautious and only added half.

I poured the custard like solution into old lunch boxes, I then placed the lids on top. Do not over fill the containers as by all accounts the soap will expand.

Below is the finished soap, it has the usual creamy soap colour and now does not smell simply of olive oil, but predominantly of lavender.


Then the washing up.

Keep the gloves and goggles and other protection on whilst cleaning up, this is highly caustic at this stage and can burn. Make sure you get all the solution off spoons, buckets and anything else that you use. Now you have to wrap up the soap to keep it warm for 24 - 48 hours.


I used all of my spare towels to wrap it up and now I have to wait and see if I have anything that resembles soap when I peek tomorrow evening. Watch this space.

If anyone is interested the costs are as follows
Bottle of olive oil - £2.39
Bottle of sunflower oil - 89p
Quarter of pack of Sodium hydroxide - 59p
Pack and half of ‘Trex‘ - £1.50
Half a bottle of lavender oil - 50p
Total - £5.87
If this works and I make 32 bars of natural vegetable soap - the cost per bar will be 18p per bar.
More tomorrow to see if this worked. If you want the full instructions of how to do this, then I used the instructions from How to make soap - from Channel 4 - from Kirsty’s handmade Christmas - my hope is to give people handmade soap for gifts. Here is another set of instructions about soap making from downsizer

Upcycling

Some of the material on the bed are clothes I have bought off the 50p rail in the Woodside animal Shelter shop, just for the fabric. I will use it somehow some day. I have a couple of old shopping bags full of material and quite frankly it needed a more suitable home.
I made the bag from old strips of vertical blinds, again from Cornwall Scrapstore. I love the concept of upcycling and although the bag is a bit rough as it’s the first time I’ve tried to use such a difficult fabric, it does the job. The blinds are not in landfill and I have somewhere to keep my scrap fabric and it cost me nothing.

Free gifts part 2!

I am having such fun! Remember my scrapstore haul from yesterday? The material at the bottom of the photo is now bunting, the material to the left of the ‘tartan’ is silky dress material, it was samples and I had about five sample pieces. Well the photo below is what they became!
I love that French looks of wrapped and knotted and I wear scarves to work with a blouse and it can make a plain suit look colourful and yet remains formal and smart. My mum also loves scarves and accessories and she can make any outfit look so feminine with a slight adjustment! I think the scarf looks quite ‘Hermes’ and I’m sure she’ll love it.
The scarf above is pure freeganism, I found it in the road. All wet and dirty, so I took it home, washed it and put it on the line. I’m also going to wrap that and give it to mum, she’ll love the story of it being found in the road.
Here are the scarves again. I sewed the squares together, then cut them in half length ways and repeated the ‘pattern’ again. Turned it inside out and then turned in the ends and sewed it again. I’ll wash it, dry and iron it and wrap it later. That’s two presents so far that haven’t cost me anything.